This option allows you to change the size/style/type of door in the garage structure, using the Door Selection dialog. The size/style/type chosen in that dialog will affect doors to be placed in the structure after the selection is made.
This option allows you to change the size/style/type of window in the garage structure, using the Window Selection dialog. The size/style/type chosen in that dialog will affect windows to be placed in the structure after the selection is made.
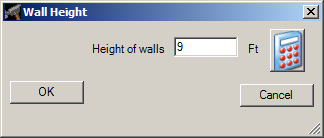
Wall Height
This option allows you to set or change the wall height for the garage structure, using the Wall Height dialog. Enter the desired value directly into the field or use the keypad, which is accessed by clicking the icon to the right of the field, and click the OK button.
NOTE: The maximum wall height is 16 feet.
Walls
This option allows you to change the parameters for walls in the garage structure, such as stud size, stud spacing and foundation parameters, using the Wall Parameters dialog. All fields in this dialog use inches as the unit of measure. After all desired values have been entered, click the OK button.
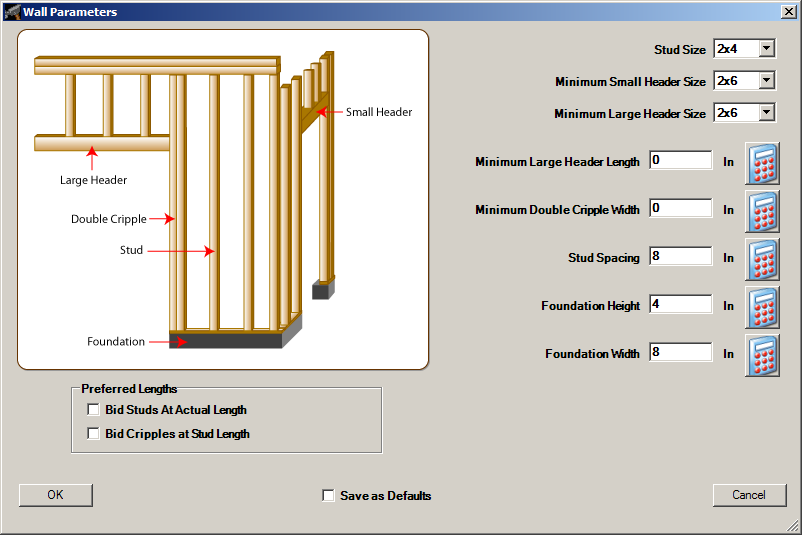
The following values can be entered through the Wall Parameters dialog:
Siding
This option allows you to change the parameters for walls in the garage structure, using the Siding By The Inch Parameters dialog. All fields in this dialog use inches as the unit of measure. After all desired values have been entered, click the OK button.
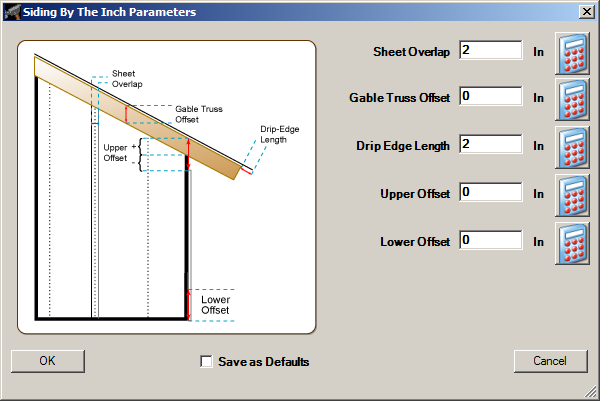
The following values can be entered through the Siding By The Inch Parameters dialog:
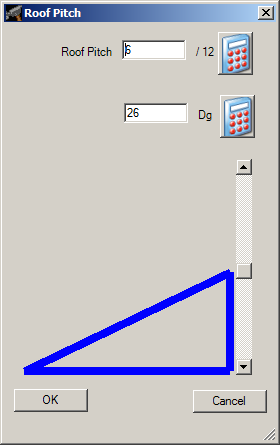
This option allows you to change the parameters for walls in the garage structure, using the Roof Pitch dialog. The roof pitch can be entered one of three ways:
Directly into either of the fields (the first field is rise over run and the second field is the number of degrees).
Using the keypads, which can be accessed by clicking the icon to the right of the desired field.
Using the slider to the right of the graphical representation of the roof pitch.
After all desired values have been entered, click the OK button.
Roof
This option allows you to change the parameters for the roof in the garage structure, such as sub fascia size, truss spacing and ladder frame spacing, using the Roof Parameters dialog. All fields in this dialog use inches as the unit of measure. After all desired values have been entered, click the OK button.
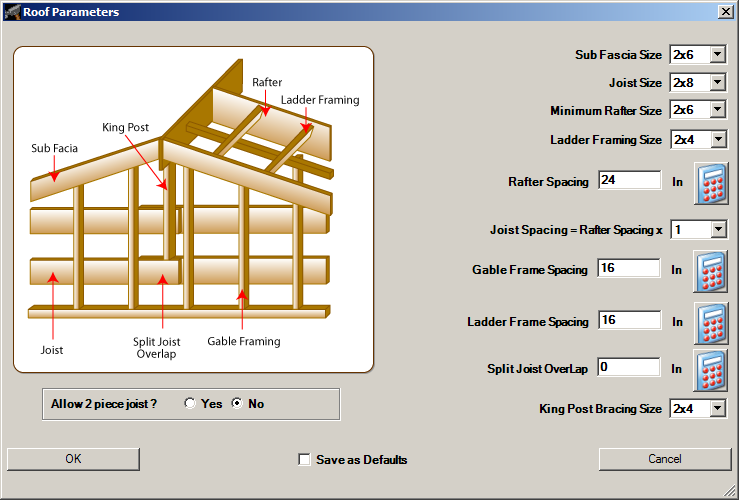
The following values can be entered through the Roof Parameters dialog:
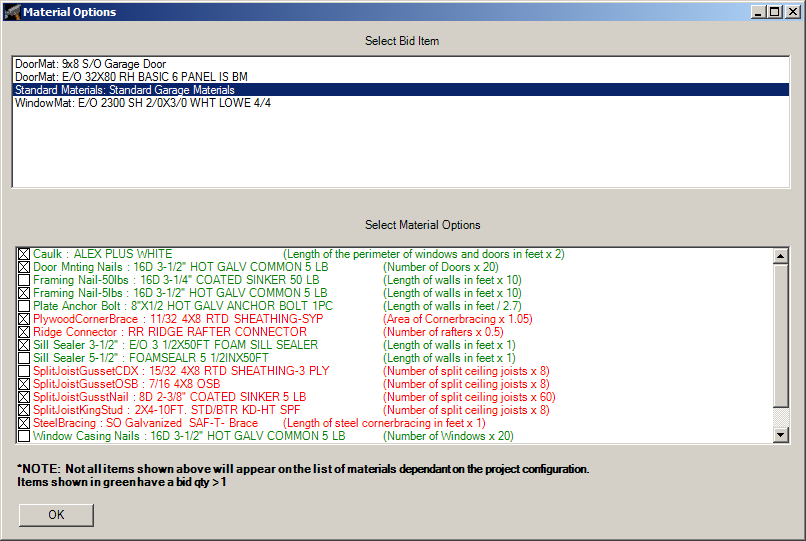
Material Options
This option allows you to change the materials that are bid in the garage structure, using the Material Options dialog. This dialog lets you remove options that are automatically selected for you. It also lets you switch between different brands of materials.
There are two parts to the Material Options dialog:
Select Bid Item: This portion of the dialog shows what items have options available for editing. The available options will be dependent on your design.
Select Material Options: This portion of the dialog shows the options that are available for the bid item. Green text indicates that the material will be used. More specifically, options in green text with the checkbox selected are being used, and will appear on the bill of materials. Red text indicates that the material is not being used in the current design. Despite the fact that options in red text aren't used, their checkboxes are still selected to indicate that if the design changes and they are needed, they are bid by default.
After all desired values have been entered, click the OK button.
Construction Preferences
This option allows you to specify materials used in the garage structure, using the Select Construction Preferences dialog. Use any of the Change buttons to view and change materials for a component of the garage structure. When all desired changes have been made, click the OK button to proceed.
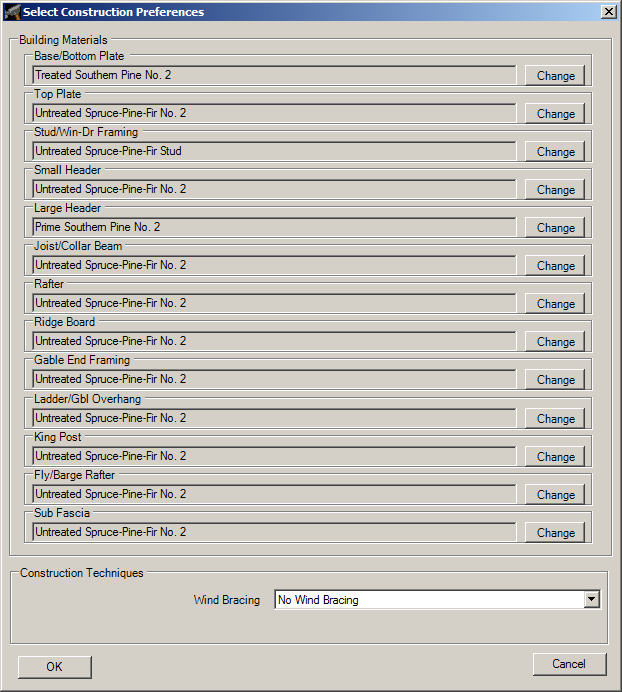
The following materials can be changed through the Select Construction Preferences dialog:
Base/Bottom Plate: The lumber at the foot of the wall, used for attaching studs.
Top Plate: The lumber at the head of the wall, used for attaching studs.
Stud/Win-Dr Framing: Boards that run vertically from the foundation up. They are the primary structure of the walls, and are used to support and secure doors and windows.
Small Header: The head of a small entryway. This provides overhead support for doorways made for the passage of a person.
Large Header: The head of a large entryway. This provides overhead support for doorways made for the passage of vehicles and other objects that would not fit through a smaller door.
Joist/Collar Beam: A horizontal timber which ties rafters together at a height above the wall plate, i.e., above the level of a tie beam.
Rafter: Provide platform for roofing materials, main components of roof.
Ridge Board: A beam at the upper ends of the rafters, below the ridge of a roof.
Gable End Framing: Most often used directly above the non-truss-bearing end walls of a building, and save the contractor the time and expense of field framing the end wall to match the roof slope.
Ladder/Gbl Overhang: The outer framing under the overhanging roof deck sheathing is formed by two long parallel 2x4's or 2x6's that are connected together laterally by short blocks, like the rungs of a ladder.
King Post: Wood post that runs from a joist to a rafter. Provides extra support for roof loads.
Fly/Barge Rafter: The rafter at the gable end that is attached to the roof sheathing above and the lookout blocks.
Sub Fascia: Boards that help compensate for inconsistencies in rafter length, and ensures that the fascia will be straight across. It also provides a continuous nailing surface for the fascia.
Construction Techniques:
Wind Bracing: Boards that run diagonally from corner to corner on a wall. This provides sheer support to the walls in the case of high winds.