Click the deck image in the Insert a Deck section of the Home Visualization pane.
Drag the deck into place.
To proportion the deck to match the house size, stretch it using the resize handles.

Big Hammer Deck Design has several options for displaying the views for your project.
To change the number of windows in the workspace, select the Views ribbon and choose one of the following options:
2 Up: Displays two windows in the workspace; side-by-side. The left-hand window defaults to Plan View; the right-hand window displays multiple view tabs, as well as a dropdown menu for choosing other views.
4 Up: Displays four windows; one in each corner of the workspace. Plan View, 3D View and Dimension View are each displayed in a separate window. The lower right-hand window displays multiple view tabs, as well as a dropdown menu for choosing other views.
Tabbed: Displays one window covering the entire workspace. The window displays multiple view tabs, as well as a dropdown menu for choosing other views.
A window can contain any of several tabs for working with different deck views:
Plan View
Displays the deck from the top. Selecting an option that requires Plan View (for example, Add a Stair) while in another view returns the view to Plan View automatically.
Joist Layout View
Displays joists, beams, posts, and optional drainage panel substructure.
Dimension View
Displays joists, beams, and posts with dimension lines.
Post View
Shows posts with dimension lines.
3D View
Select 3D View and drag the mouse to change the viewing angle.
The Rotate button controls 3D rotation.
The Shadowing button is used to adjust the position of the sun and change how shadows are cast.
The Layer button is used to hide and show components of the design in the 3D view to inspect specific layers of the design.
Bill of Materials
The Bill of Materials shows a SKU Usage List, Material List, and Material Usage List.
Home Visualization
To see the deck on a photograph of a house, import a photograph of a house (.jpg, .bmp, .gif, or .png) using the Add a Home Image option in the Home Visualization pane. The photograph can also be imported from the Home Photo option in the Home ribbon.
Click the deck image in the Insert a Deck section of the Home Visualization pane.
Drag the deck into place.
To proportion
the deck to match the house size, stretch it using the resize
handles. ![]()
You can also bend and reshape the deck by activating Warp mode.
Activate
warp mode by clicking this handle. ![]()
Drag a warp
handle. ![]()
To add other items to the visualization, such as trees and shrubs, scroll through the list in the Select Scenery section of the Home Visualization pane.
After any object is dragged and placed into the visualization, the object can be moved, resized, or removed from the scene. To modify an object in the scene, click it to display the options.
Railing Post View
Shows railing posts with railings and stairs.
Dragging and Dropping Tabs
You can relocate tabs by dragging and dropping them in the workspace.
Example: Dragging the tab to the bottom position creates a new window for the tab.
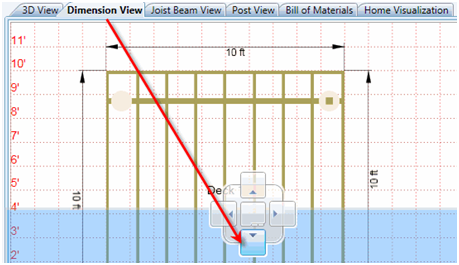
NOTE: To restore the default view, choose one of the options (2-Up, 4-Up or Tabbed) from the Views ribbon.
Grid Options
Selecting Grid Options from the Home ribbon displays the Setup Units and Snap Mode dialog, which allows you to set the grid spacing for Plan View, and allows you define how objects are placed on the grid.
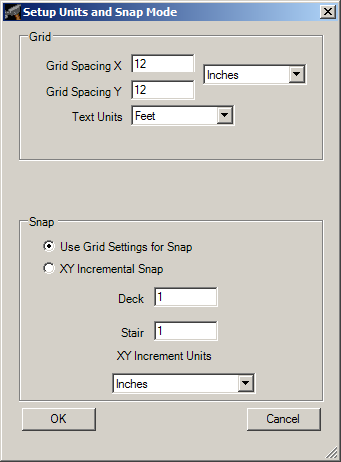
Use Grid Settings for Snap: Objects will be moved in increments to correspond with grid spacing so that they are aligned with the gridlines.
XY Incremental Snap: Objects will be moved in increments to correspond with values entered in the fields for Deck and Stair as shown in the dialog.
Visibility
If your deck project contains multiple deck structures, you can specify which deck(s) are displayed by using the Visibility option on the Views ribbon. This option is grayed out if your deck project only contains one deck structure. The All Decks option is the default value. This option displays all decks in the project within the active view. If you only want to see one particular deck in the active view, choose the Deck Number from the dropdown menu. The Deck Number corresponds to the information displayed on the deck.
NOTE: Visibility is set on a per-view basis. If it has been set in Plan View, the same configuration will not be shown in other views (such as 3D View), and you will need to select the desired visibility option from the dropdown menu.